Univention 5.2 & NextCloud

I’m running it in a VM. So did you setup a separate virtual disk for the boot partition? I just gave the installer a disk of sufficient size and let it set it up how it wanted.

If you have any pointers to a tutorial or other documentation on how you set yours up I’d be interested in seeing it. It sounds different to anything I’ve ever done with any of my VMs.

Since I run a 3-node Proxmox cluster with Ceph underneath, the Univention base is three domain controllers and then (currently) two VMs for playing around with NextCloud: if the App-store wasn’t mostly empty these days, there’d be more for other stuff, perhaps, but the control scope of Univention as a domain tool is much bigger and includes many physical machines running Windows and Linux.

For the domain controllers I just (thin) allocate a single 32GB disk, vastly more than it should ever need, but with thin allocation and discard/trim support that shouldn’t matter.

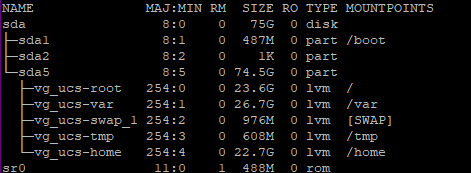
Within Debian/Univention I just create a single disk for everything, except that Debian evidently seems to do a separate swap even if I tell it to use the full disk… in any case I see that as a separate partition when looking inside the VMs, while /boot resides on an ext4 root partition, that’s used for everthing not swap.

Partitioning disks has its roots in ancient computer history, it’s mostly been used to avoid certain error scenarios or technical limitations (DOS PC disks had to be partitioned because FAT12 file systems were limited 32MB), while it reduces flexiblity and simplicity in most other ways.

And while you could alway boot DOS, Unix requires a bit more to just get running well enough to start fixing disk issues; the standard operationg procedure used to be a separate disk (or partition) for the OS, so disks/partitions/filesystems with the most user activity (and thus chances of errors/corruption) could be fixed while the relatively static boot/start OS disks/partitions would stay clean enough to enable at least a partial OS start.

In a VM environment those precautions may be much less necessary, because you can just mount your only drive to another OS instance to investigate issues and fix things. Whether that means you should avoid functional separation really depends too much on operational conditions and operator experiences to decide once and for all: read-only OS images that can always be rolled back to a snapshot, try to solve the problem, but edge cases persist.

Any advice I can give would be biased on my set of experiences and skills, often enough you need to trade simplicity of setup vs. simplicity of solving problems, resulting in the most complex setup in scenarios where availability targets hover around 0.9999% uptime.

And in my experience as someone who used to operate mission critical payment systems where 30 minutes of failure would have caused national headlines, while 5 minutes might just loose me the job, I don’t really trust smart automation as much as fault tolerance at all levels of design in combination with experience gained via testing failure handling before they happen.

Of course the home lab environment doesn’t need any of that, but the fact that VMs allow for easy snapshots and resumes allows you to gain experience much more easily on the “job”.

Perhaps the shortest variant would be: if your VM-system is one of many nearly equals, using one of those to fix an issue within something broken may be less effort in the long term than dealing with overflowing partitions. And while root and boot file systems can’t be extended while mounted, that limitation doesn’t exist on a system where you temporarily mount that disk as secondary. And if resizing in-place is not an option, anything in Unix/Linux can just be copied to a new and bigger virtual disk, which can then be used instead: no hidden files or odd fixed blocks any more, like in the old days when bootloaders couldn’t understand file systems.Transplanting an existing system to a new disk, something that used to be an entire industry in the Wintel-PC space, is so easy on Unix/Linux, nobody even talks about it… and that can become an issue for a younger generation. So I suggest you simply try that a few times, after snapshots/backups, of course, or perhaps on a discardable VM.

But typically the /boot partition simply shouldn’t be that small to become an issue, perhaps you gave the entire machine too small a disk, because you were thinking in full allocation terms and not thin allocation.

With today’s CPUs, SSDs and trim/discard the overhead of thin provisioning is most likely unnoticeable for most scenarios, so errors caused by tiny disks are more easily avoided.

Hope this helps!

I gave it a 120GB disk and the installer created a 487M boot partition. It is now a royal pain.

My plan at this point is basically what you mentioned. I’ll snapshot the VM, shut it down, and add a slightly bigger disk. Then I’ll partition the new disk with a gap after the boot partition which is big enough to expand the boot partition to 1G. Then I’ll dd the existing partitions to the new disk, make sure everything runs fine off the new disk, then expand the boot partition to fill the gap.

I think that’s a fairly safe way to do it. I couldn’t find a tool that can just expand an interior partition. It seems going through the process of manually making a gap somehow is necessary with all the tools.

The closest to automatic I could find was clonezilla’s option to proportionally expand partitions when cloning to a bigger disk, but I’d have to go to a much bigger disk to get a meaningful amount of extra space on the boot partition since it’s so small compared to the data partition.

Well, there is no need for the boot partition to be separate. But changing boot to a new device may be tricky unless you know your way around with grub and the tool suite around it. I don’t believe it’s overly complicated, and not so dangerous with VM tooling to support you.

So yes, going partition by partition may be the easiest and most generic fix, but watch out for disk and partition labels, which might still be used in various places like /etc/fstab or the grub configuration using a UUID reference. You may want to record the original ones and then perhaps just overwrite them on the copied larger disk. Read the man-page on grub2-config, perhaps.

And make sure you don’t loose your way back, but you know this.

Paragon Systems’ disk manager is great for resizing, moving and consolidating anything Windows and may even include ext4 partition support, but that’s throwing a heavy and costly tool at what should be a minor problem with Linux, especially when virtualized. It also needs a Windows OS to run on…

Linux is typically a minor player and this partition move issue too rare a need, so a Linux native market never developed and open source doesn’t support “lazy users”, when that involves such heavy lifting. Partition moves require replicating decisive code of the file system within your application, you’d not get customers, only flame wars on Linux for even trying, I’d guess.

Resizing partitions and file systems on the other hand, has become a sufficiently normal issue to have supporting code baked natively into LInux itself, so there you are, with some parts being super easy, others a bit of a pain.

And as much as I like Clonezilla, it can only do what a normal Linux can do, too. I tend to use it only with physical hardware; on VMs just using another instance of the same OS avoids all kinds of other issues.

Clonezilla might copy disk labels by default…

If you try and succeed, please report back :grinning:!

After several failed attempts on a clone of my vm I used a solution I found on a blog post which was to move the boot partition to the end of the disk and then fix grub afterwards. One thing I didn’t expect as I’ve never had to move a boot partition before, or really mess with a linux boot partition at all outside of the normal install and update processes, was that any tinkering at all seems to break grub. In almost all cases even grub rescue would not appear.

Anyway, here is the process I used. It was a quick process. The subsequent update to 5.2-3 was a long one though. It took just over an hour, but did complete successfully.

shutdown
make a snapshot of the drive for safety
add 2 gb of space to the vm drive

set the vm cd to use the gparted live cd
change boot order to boot from the cd

in gparted
copy boot partition of drive and paste to end of drive where unallocated space is
the paste operation will also let you expand the size to 2gb at the same time

apply the changes so the copy actually happens

delete old boot partition
apply the changes

poweroff
remove cd from the vm
fix boot order if needed
booting now will go to grub rescue

use ls in grub rescue to figure out your boot partition
ls (hd0,msdos3)/ (note / at end which will list contents of the partition)

then the following commands should allow it to boot up normally
set root=(hd0,msdos3)
set prefix=(hd0,msdos3)/grub
insmod normal
normal

after booting, verify /boot is mounted

fixup grub so it boots normally next time
grub-install /dev/sda
grub-mkconfig -o /boot/grub/grub.cfg

reboot to verify

@Kevo @abufrejoval
I know we are slightly wandering off-topic, but the issue seems to be the default UCS installer configuration.
If you go with the default LVM config you get something like this:


(bear in mind, we already resized the /var partition by 15GB)

In many cases, the default isn’t right but Debian installer doesn’t make it easy to see (I guess it’s down to plan phase and tests before proper installation).