Overview
SAML Identity Provider is an app in the UCS App Center which provides SAML functionality. SAML is an XML-based open standard data format for exchanging authentication information. It enables web-based authentication and authorization scenarios including cross-domain Single Sign-On (SSO).
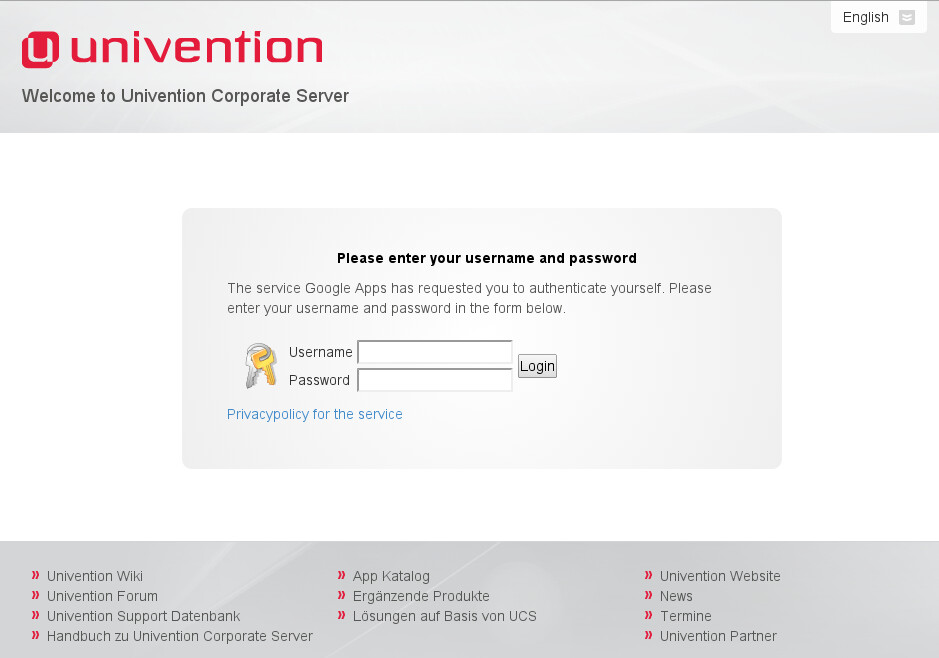
The app is based on SimpleSAMLphp which implements SAML 2.0. The app allows the configuration of an identity provider which can be used to authenticate and authorize users who wish to use external service providers. This allows domain users to use external services with their domain credentials as a Single Sign-On (SSO) solution.
Installation
SAML Identity Provider is available through the App Center and can be installed using the corresponding UMC App Center module. The SAML Identity Provider app can be installed on a domaincontroller master or domaincontroller backup.
Configuration
The SAML identity provider is configured with a Univention Management Console module of the same name. Users are configured to use a service provider in the Univention Management Console Users module.
Three example configurations for the following service providers come pre-configured with the SAML Identity Provider app:
- testshib.org - a SAML2 testing ground
- Google Apps for business - offers a cloud based office suite
- Salesforce - offers cloud based customer relationship (CRM) products
Allowed users
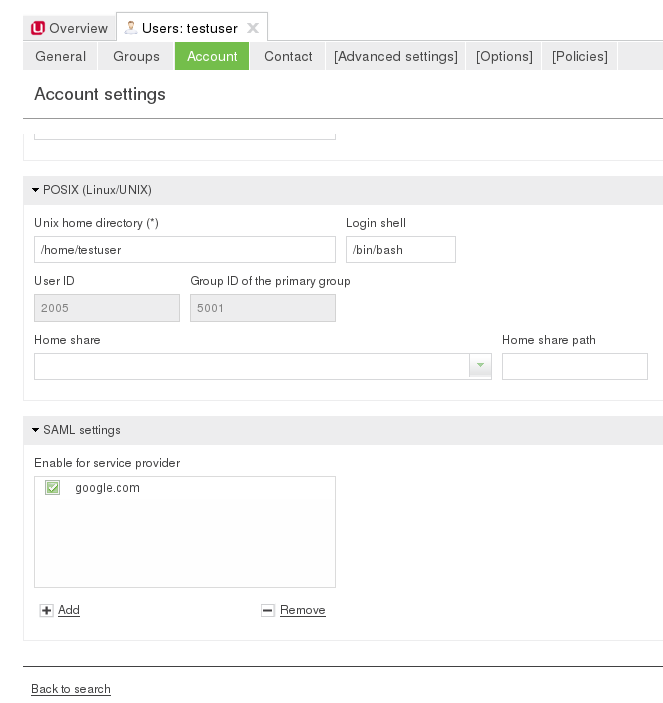
By default no user is allowed to use any service provider. Users can be activated by adding any configured service provider on the users ‘Account’ tab in the section ‘SAML settings’.
Adding service providers
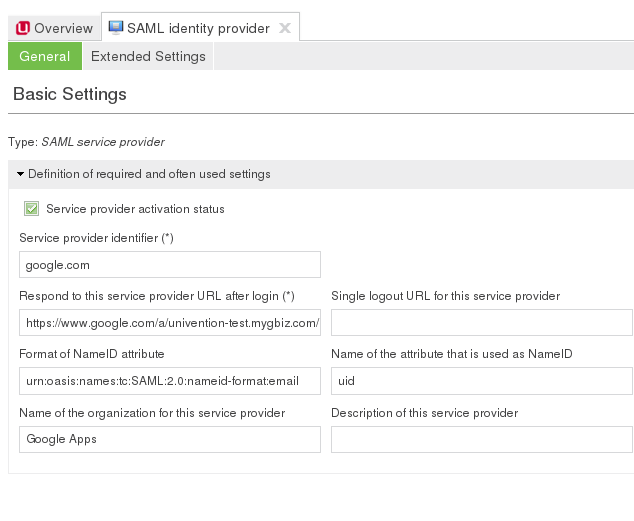
Service provider configuration is done within the Univention Management Console (umc) module SAML identity provider. At least 2 Parameters have to be provided (but are probably not sufficient) for each service provider:
-
Service provider identifier: The identifier with which the service provider is recognized at the identity provider.
-
Respond to this service provider URL after login: The URL of the AssertionConsumerService metadata endpoint for this service provider. Users will be redirected to this URL after authentication.
The checkbox Service provider activation status has to be enabled to activate the service provider configuration. If it is deactivated, the login to the service provider is not possible.
In addition the following options have to be configured for most service providers:
-
Format of NameID attribute: The NameIDFormat this SP will receive. The service provider documentation should mention which formats are accepted. Example: urn:oasis:names:tc:SAML:2.0:nameid-format:email
-
Name of the attribute that is used as NameID: The ldap attribute that should be used by the NameIDFormat option mentioned above. Example: uid
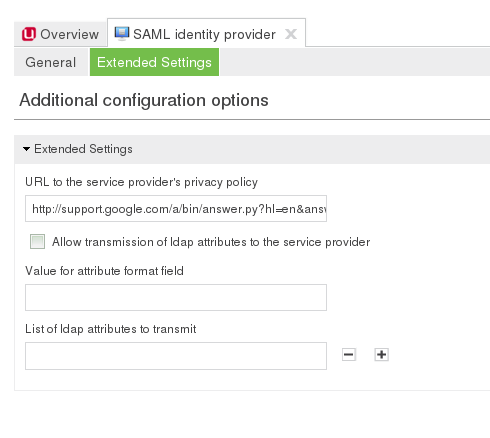
Additional options include a list of the users ldap attributes that should be included in the SAML assertions message as well as settings to configure additional information that is presented to the user about the service provider, e.g. the name of the organisation operating the service, a description that is shown during login or a privacy policy.
If additional user attributes are to be sent to the service provider, their format (e.g. urn:oasis:names:tc:SAML:2.0:nameid-format:email) and the name of the attributes must be set on the Extended Settings tab.
Example configuration and testing of testshib.org
https://testshib.org is a website for testing identity and service providers. An example configuration is provided with the SAML identity provider app from Univention App Center. To setup and test this service provider, the following steps are necessary:
-
Open the testshib.org service provider entry in the UMC SAML Idendity provider module. Active the service provider by enabling the respective checkbox on the testshib.org configuration page in the SAML identity provider module and save the change.
-
Setup your UCS configuration on testshib.org:
-
Point your webbrower to
https://ucs-sso.[domainname]/simplesamlphp/saml2/idp/metadata.php -
Save this page which contains metainformation as a file on your hard drive.
-
Visit https://www.testshib.org/register.html and upload your metadata file you just saved. The service is now configured to receive login information from your Univention Corporate Server. To start the login test:
-
-
Visit https://sp.testshib.org/
-
Enter the entityID URL of your Univention Corporate Server and click on Go!. The URL is of the form
https://ucs-sso.[domainname]/simplesamlphp/saml2/idp/metadata.php -
You will be redirected to the Single-Sign-On page on your Univention Corporate Server. Enter the credentials of a user that is enabled to use the testshib.org service provider.
-
You will now be redirected to testshib.org, where additional information about the successful login will be displayed.
Example configuration of Google Apps for business as a service provider
NOTE: There is now a separate connector App to easily synchronize users to Google GSuite
In this example google apps is configured as a service provider for single sign on of domain users. A valid (test-)account of google apps is necessary to follow this example; its creation is beyond the scope of this article.
In this howto section the configured google apps domain is TESTDOMAIN.mygbiz.com. Whenever this domain is mentioned, it should be replaced by the domain configured for your test environment.
First, a testuser should be created inside the new google apps account, which has to have the same username as the UCS user that will be used to test the service provider (e.g. testuser).
To enable single sign on in the Google apps admin console, the security control widget has to be opened. The single sign on settings can be accessed by selecting advanced settings. After ticking the Enable Single Sign-On check-box, several URLs have to be provided. The sign-in page URL should be set to
https://ucs-sso.[domainname]/simplesamlphp/saml2/idp/SSOService.php
The domain name or the ip address of the UCS server can be used. As the SAML messages are transferred by the client browser, a private IP-address can be used. It is only necessary that the client can access both the UCS server URL and the service provider. The sign-out page URL should be set to
https://ucs-sso.[domainname]/simplesamlphp/saml2/idp/initSLO.php?RelayState=/simplesamlphp/logout.php
Set the change password URL to
https://[FQDN or IP address]/umc/
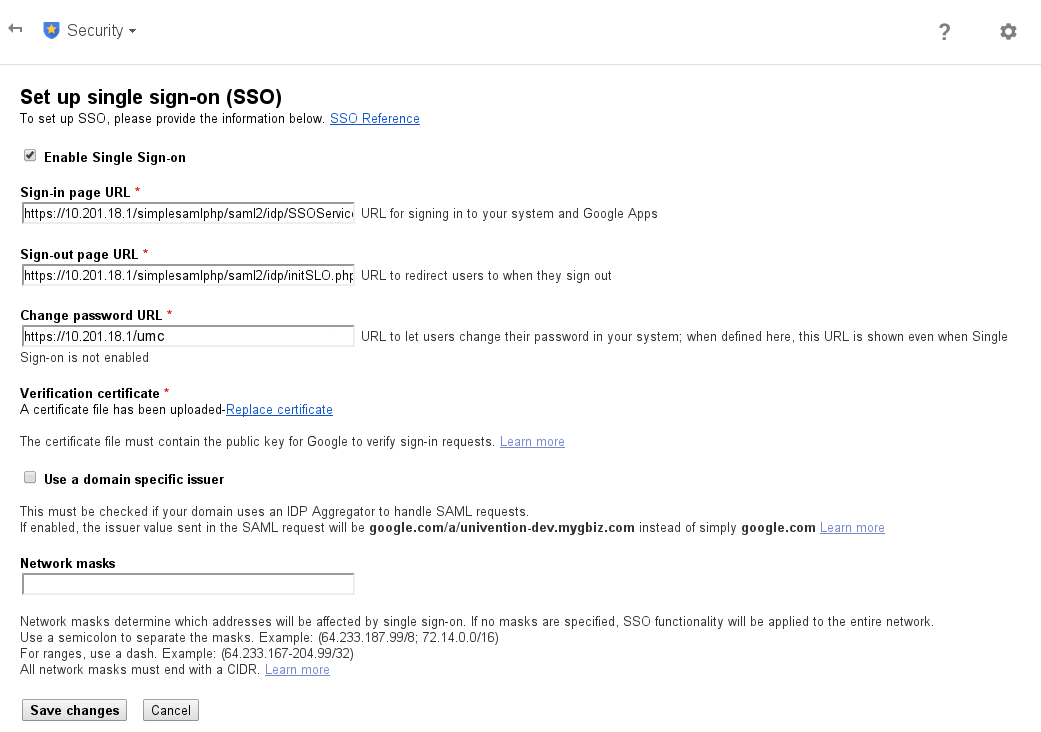
Next, the identity provider’s public certificate has to be uploaded. By default it is available on the UCS server in the following location:
/etc/simplesamlphp/ucs-sso.[domainname]-idp-certificate.crt
The last check-box defines which issuer or identifier will be send to the identity provider. If not checked, google.com will be send as the identifier, which works for our example.
After saving the changes, the service provider can be configured on the UCS server. We need the URL of the Google apps account domain (e.g. TESTDOMAIN.mygbiz.com). In the SAML identity provider module the google.com entry has to be opened. The check-box Service provider activation status must be enabled. After that, the URL in the field Respond to this service provider URL after login must be updated with your Google apps account domain (e.g. TESTDOMAIN.mygbiz.com). The changed have to be saved.
Now the testuser has to be configured to be able to use the new service provider. On the Account tab of the testuser account the service provider google.com has to be added. After that, there are two ways to access google apps as the testuser:
- Via the google apps login page: Use a webbrowser to navigate to the following URL, enter testuser@TESTDOMAIN.mygbiz.com and click on Login. The browser should be redirected to the single sign on page.
https://www.google.com/a/TESTDOMAIN.mygbiz.com
- Directly from the identity provider. The session starts at the identity provider by adding the service provider information as parameters to the URL. Point the webbrowser to the following URL, where the authentication webpage is presented to the user.
https://ucs-sso.[domainname]/simplesamlphp/saml2/idp/SSOService.php?spentityid=google.com&RelayState=https://www.google.com/a/TESTDOMAIN.mygbiz.com/Dashboard
On the identity provider login page enter the local username and password. After successful authentication and authorization the browser will be redirected to the Google apps dashboard, already logged in with the testuser.
Useful configuration options
To configure a service provider, various information is needed on the service provider’s end. To verify that received metadata is originating from your Univention Corporate Server, one of the following two will need to be provided:
-
The public certificate used by the SAML identity provider. By default the certificate is located on the Univention Corporate Server at
/etc/simplesamlphp/ucs-sso.[domainname]-idp-certificate.crt -
Metadata file which contains the public certificate. You have to supply either a link to the metadata file or the file must be uploaded directly. The file can be downloaded from
https://ucs-sso.[domainname]/simplesamlphp/saml2/idp/metadata.php
Some service providers can be configured to send a logout request to the identity provider. The following URL is available for this feature:
https://ucs-sso.[domainname]/simplesamlphp/saml2/idp/initSLO.php?RelayState=/simplesamlphp/logout.php
In case the login process to a service provider should be initiated from the Univention Corporate Server, the following URL can be visited. The service provider identifier equals the value entered in the service provider configuration.
https://ucs-sso.[domainname]/simplesamlphp/saml2/idp/SSOService.php?spentityid=[Service provider identifier]
SAML Identity Provider UCR Variables
UCR variables control the basic behaviour of SimpleSAMLphp. The most important are mentioned here with descriptions that are helpful to understand SimpleSAMLphp’s configuration.
-
saml/idp/ldap/get_attributes: The list of ldap user attributes that are read from ldap after succesful user authentication. Values that are not mentioned here cannot be evaluated for authentication or forwarded to the service provider. (default: ‘uid’, ‘mailPrimaryAddress’, ‘enabledServiceProviderIdentifier’)
-
saml/idp/ldap/search_attributes: A list of ldap attributes that are filtered for the provided username (default: ‘uid’, ‘mailPrimaryAddress’)
-
saml/idp/certificate/certificate: The service provider needs to know if the SAML message with the info about successful originates from the correct identity provider. The SAML message is therefore cryptographically signed by a public-private key pair. This UCR variable contains the path to the public part of that key pair. During installation of the SAML Identity Provider app, new keys are generated. If you change these keys the current public key has to be uploaded to service providers.
-
saml/idp/certificate/privatekey: The path to the private key used to sign messages to the service provider.
-
saml/idp/technicalcontactname: The name of a helpdesk contact which is shown to the user when he encounters problems with the identity provider.
-
saml/idp/technicalcontactemail: A contact email address which is shown to the user when he encounters problems with the identity provider.
Debugging
To test or debug the current settings, set the UCR variable saml/idp/log/debug/enabled to TRUE. The loglevel can be configured with the UCR variable saml/idp/log/level, which is set to NOTICE by default. For debugging purposes INFO or DEBUG can be used. The debug output can be found in /var/log/syslog.
Links
- simplesamlphp.org Homepage of the SimpleSAMLphp project